
Light switch wiring is a fundamental aspect of any electrical system in a home. Understanding how to wire a light switch can be a valuable skill for homeowners looking to perform basic electrical maintenance or improvements. This guide will cover everything you need to know about light switch wiring, including different types of switches, tools required, safety precautions, and step-by-step instructions.
Types of Light Switch Wiring
Before diving into the wiring process, it’s essential to understand the various types of Light Switch Wiring available. The type of switch you choose will determine the wiring configuration.
1. Single-Pole Switch
The single-pole switch is the most common type used in homes. It controls a single light or a group of lights from one location.
- Features:
- On/off functionality
- Two terminals (hot wire and load wire)
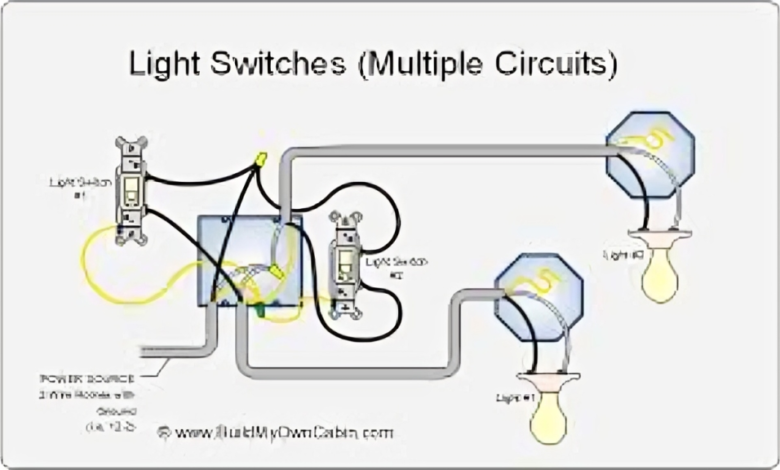
2. Three-Way Switch
A three-way switch allows you to control a single light from two different locations.
- Features:
- Used in hallways or staircases
- Requires three wires (hot, load, and traveler)
3. Four-Way Switch
A four-way switch is used when you want to control a light from three or more locations.
- Features:
- Installed between two three-way switches
- Requires four wires
4. Dimmer Switch
A dimmer switch allows you to adjust the brightness of a light.
- Features:
- Compatible with various light bulbs
- Requires additional wiring compared to a standard switch
Tools and Materials Needed for Light Switch Wiring
To ensure a successful wiring job, gather the following tools and materials:
- Screwdrivers (flathead and Phillips)
- Voltage tester
- Wire stripper
- Electrical tape
- Wire connectors (wire nuts)
- Light switch
- Electrical box
- Circuit breaker panel access
Safety Precautions
Working with electricity can be dangerous if proper safety measures are not followed. Here are some critical safety tips:
- Turn Off Power: Always switch off the power at the circuit breaker before working on any electrical system.
- Use a Voltage Tester: Double-check that the power is off by using a voltage tester.
- Wear Protective Gear: Wear rubber gloves and safety goggles to protect yourself from electrical shocks and debris.
- Follow Local Codes: Ensure that your wiring project complies with local building codes and regulations.
Step-by-Step Guide to Wiring a Single-Pole Light Switch
Below is a detailed guide on how to wire a single-pole Light Switch Wiring, the most common type of switch.
Step 1: Turn Off Power
- Locate your home’s circuit breaker panel.
- Turn off the breaker that controls the light circuit you will be working on.
- Use a voltage tester to confirm that the power is off.
Step 2: Remove the Old Switch
- Remove the switch cover plate using a screwdriver.
- Unscrew the existing switch from the electrical box.
- Carefully pull the switch out to expose the wires.
Step 3: Identify the Wires
- Hot Wire (black): This wire brings power from the electrical panel.
- Load Wire (black or red): This wire delivers power to the light fixture.
- Ground Wire (green or bare copper): This wire provides a path to the ground to prevent electrical shocks.
Step 4: Connect the New Switch
- Connect the hot wire to the brass terminal on the new switch.
- Connect the load wire to the other brass terminal.
- Attach the ground wire to the green screw on the switch.
Step 5: Secure the Switch
- Push the wires back into the electrical box carefully.
- Screw the new switch into the box.
- Replace the cover plate.
Step 6: Restore Power
- Turn the circuit breaker back on.
- Test the new switch to ensure it works correctly.
Wiring a Three-Way Light Switch Wiring
Wiring a three-way switch is slightly more complex but manageable with careful attention to detail.
Step 1: Turn Off Power
- As with the single-pole switch, turn off the power at the circuit breaker and confirm with a voltage tester.
Step 2: Identify the Wires
- Common Wire: This wire connects to the power source or light fixture.
- Traveler Wires: These wires connect the two three-way switches.
- Ground Wire: Connects to the green screw on the switch.
Step 3: Connect the Wires
- Connect the common wire to the black screw on the switch.
- Connect the traveler wires to the brass screws.
- Attach the ground wire to the green screw.
Step 4: Install and Test
- Secure the switch in the electrical box and replace the cover plate.
- Restore power and test the switch functionality.
Troubleshooting Common Issues
Even with careful installation, you may encounter some issues. Here are common problems and solutions:
Problem 1: Light Doesn’t Turn On
- Solution: Check the wiring connections and ensure all wires are securely connected. Confirm that the circuit breaker is on.
Problem 2: Flickering Light
- Solution: Ensure that the light bulb is screwed in tightly. If using a dimmer switch, check compatibility with the light bulb.
Problem 3: Switch Feels Warm
- Solution: A warm switch could indicate an overloaded circuit. Consider consulting a licensed electrician.
Conclusion
Learning how to wire a Light Switch Wiring is a valuable skill that can save you time and money. By understanding the different types of switches, gathering the right tools, and following safety precautions, you can confidently complete your light switch wiring projects. However, if you encounter any difficulties or feel unsure, it’s always best to consult a professional electrician to ensure safety and compliance with local codes.